Rubber Safety Tiles Installation Guide
Smith Brothers’ outdoor rubber safety tiles must be installed correctly if you want them to offer the best possible protective surface. This is a relatively straightforward process and, while we recommend using a professional installer for public applications, such as for playground safety flooring, domestic customers should be able to get good results with a DIY installation.
The following guidelines will help you create a safe, stable surface suitable for play areas and a whole range of other applications.
Please note: Smith Brothers’ Wet Pour products must be installed by a professional, so please contact us to arrange a Wet Pour installation.
Installation Types
How you install your tiles will depend on whether you are installing them on top of an existing surface, such as slabs or concrete, or want the finished surface to be level with the surrounding ground.
Surface Mounted Rubber Safety Tiles

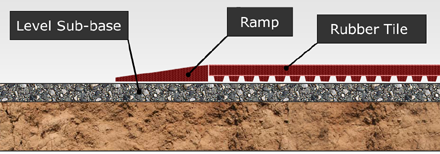
When laying tiles on top of an existing surface such as concrete or tarmac, it is important to make sure the surface is stable, level and clear of all debris, including weeds.
If you are installing your tiles on top of newly laid concrete, you will need to allow it to fully cure (around 4-6 weeks) or use a concrete sealant.
Begin by laying your tiles out in the desired configuration, then leave them to acclimatise and cool. This is important because the tiles can expand slightly when warm.
When the tiles are acclimatised, mark any that need to be cut down with chalk and cut them using a sharp Stanley type knife, serrated knife or electric jigsaw. Make sure you cut the tiles so that they are as tightly fitted as possible. Replace the cut tiles into the desired position.
Starting from a corner, lift your first tile and apply tile adhesive directly to the concrete or tarmac. The adhesive, which comes in tubes for ease of use, is most effective if laid in a cross from corner to corner. This will bond where the middle and four corners of the tiles will sit. The bead of adhesive should be approximately 8 to 10mm in diameter.
Carefully replace the tile, pushing it down firmly onto the adhesive.
You can then lift the next tile and repeat the process. It is also advisable to place a line of adhesive along the edge of each tile where it will meet an adjacent tile. This will hold the tiles together and help to prevent lifting.
You are strongly advised to allow the adhesive to cure for at least 24 hours before making use of the newly tiled area.
We also advise placing ramped tiles at the edges and corners of the tiled area to prevent tripping and provide access for wheelchairs.
Flush Mounted Rubber Safety Tiles

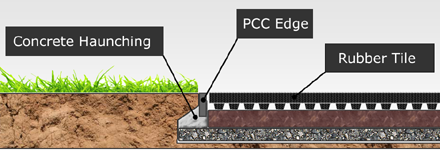
If you want a safety surface which is level with the surrounding ground, you will need to dig down by the desired thickness of the safety tiles, plus at least 150mm.
Begin by laying at least 75mm depth of compacted M.O.T. type one stone. On top of this you should then lay at least 75mm of class E concrete. Whatever thickness of these base materials you use, it is important to leave exactly the right depth to fit the required thickness of rubber tiles.
Once the concrete has cured (or been treated with a sealant) you can lay your tiles in exactly the same fashion as for surface mounted tiles.
The tiled area will need to be edged with PPC edging which should be bedded and haunched with 100mm of class E concrete.
To order Smith Brothers rubber safety tiles, for a quote or for further installation advice, contact us today by calling 02392 387 198. Or feel free to send us an email, or request a call back.


